Here I will show you how to mint a Bitcoin NFT from the Electrum wallet. Your artwork will be made up of small amounts of Bitcoins, not too different from crafting jewelry out of gold. With one essential distinction: Bitcoin art is permanent. So please think twice or thrice before minting – your artwork is forever.
Your art will be represented either by one unique token (literal NFT) or a limited edition of fungible tokens. Your choice.
Your token(s) will be included in the Bitcoin Stamps directory. By the way, Stamps named the encoding OLGA in my honor 🙂
Setting up Electrum
This guide is for Electrum 4.5.3.
You can either use your existing wallet or set up a dedicated one.
Existing Wallet
Your wallet will work as long as the addresses are of either format:
- P2PKH – classic –
1HbJtt8hm7TGd2DhHvxuw4BRdZsd2iuxYp - P2SH – classic multisig –
3GWCaREJRyrcB4iccpDw9kcnctJpPDAjKh - P2WPKH – bech32 –
bc1qqqj54caf4cusvycr4dmzv24pgh875xeg8d5wrq
Note that multisig bech32 (P2WSH) will not work! Unlike regular bech32, these addresses are very long, like bc1qa7awqz6fk9p2eun2uswl32p49ctk5t2866yvlrnzstm4e74zvy0sqhycxa. Taproot addresses (P2TR), beginning with bc1p, also do not work.
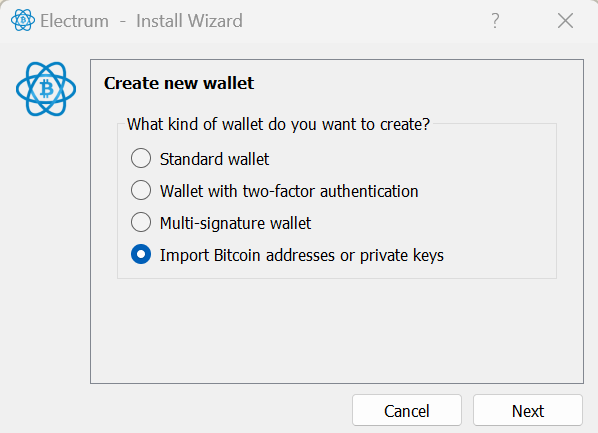
New Wallet
I recommend importing an address from your favorite Counterparty or Stamps wallet (note that FreeWallet does not display Stamps). A fresh, dedicated address is always a good idea. It limits risk in case something goes wrong.
Select Input Coin
If the Coins tab is not visible, activate it under View.
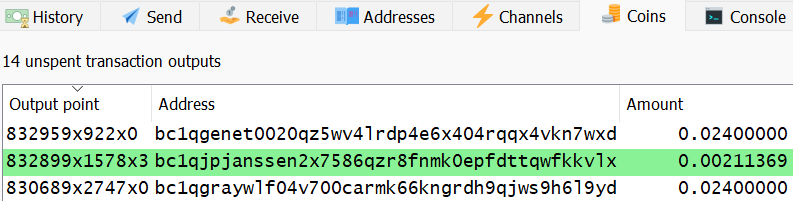
Select the coin to be used for the mint. Any coin will do as long as the Amount is sufficient to cover dust and fees. ₿ 0.001 should be fine for a relatively large file. For tiny pixel art you can get away with much less. Leftover is returned to your change address.
Right click -> Add to coin control. The coin is now marked in green.
Right click again and select Copy -> Long Output point.
Generating the Minting Transaction
Open the OLGA STAMP MINTER.
You will need to provide three inputs:
- UTXO (Input Coin) – Paste the
Long Output pointthat you copied from Electrum. - Supply – Any positive integer is valid. The default is
1to mint one unique token (literal NFT) but you can also opt for a limited edition, like 10 or even 100 or more. - File – Open a file from you computer. Any file type is accepted but only gif, jpeg, png are svg supported by all explorers. The maximum file size is 6304 bytes. The file name should consist of alphanumeric characters, underscores (_) and dash (-) only. Spaces and non-latin characters are not allowed.
A fourth optional parameter is tip. The default is zero but any tip is highly appreciated.
Click Generate Transaction. If all goes well, you will see something like this:
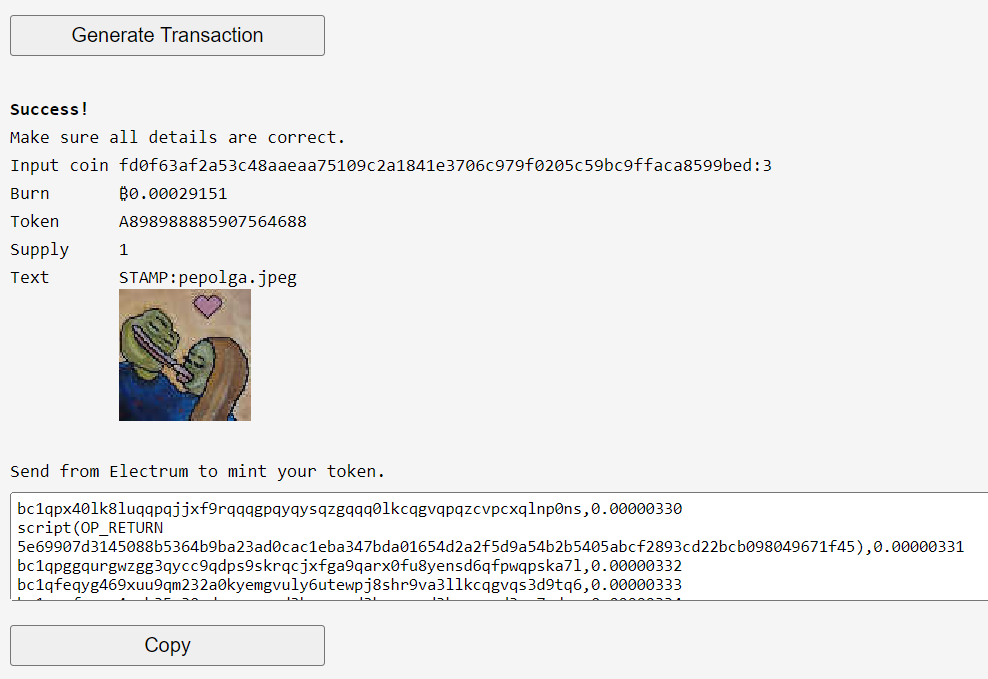
Copy the transaction and open Electrum.
Note: If you use Electrum 4.4 or older, the second line must be modified. Remove script( and the closing parenthesis ) to get the format OP_RETURN deadbeef,amount.
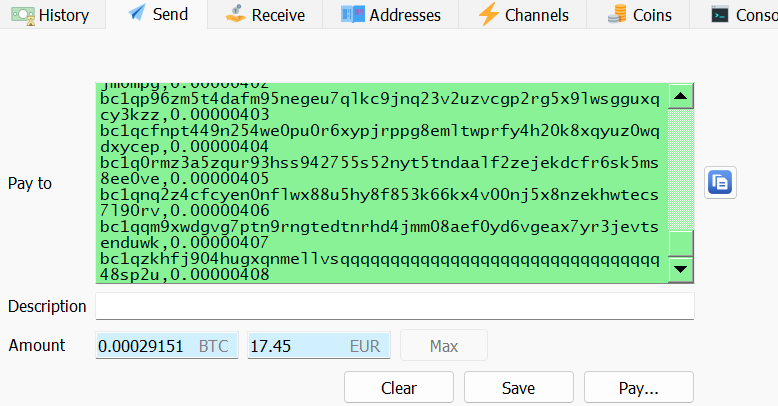
Send From Electrum
Paste into the Pay to field and click Pay....
In the New Transaction window, click on the input …
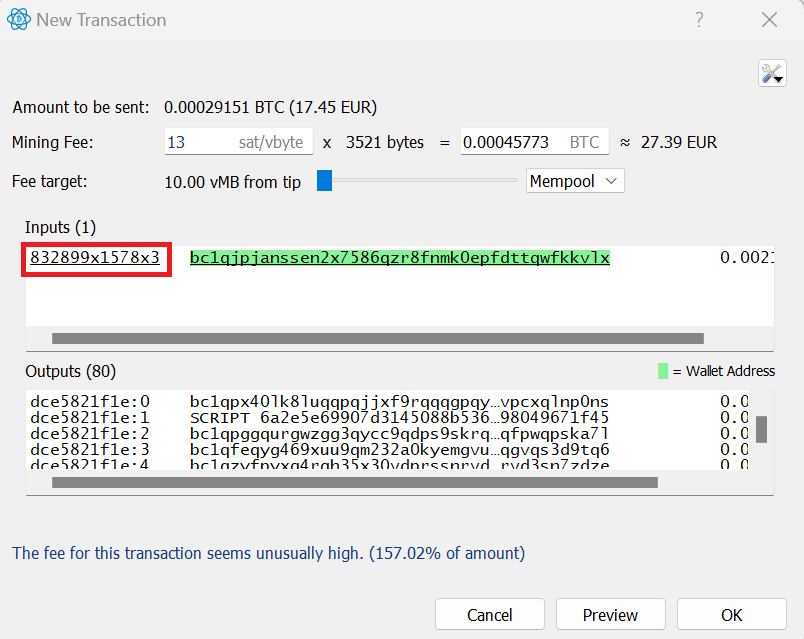
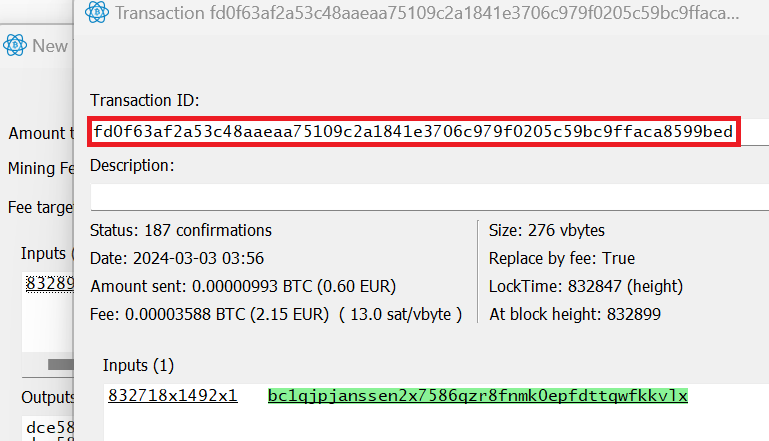
… and confirm that the Transaction ID is the same as the input coin. Then close this window.
Click Preview, then Sign and Broadcast.
A rejected transaction message might appear. It means the bitcoin node you are connected has a strict filter. Then Share -> Copy to clipboard. Push the raw transaction from BlockCypher.
Tips
- Try the Testnet Minter first.
- View transaction details, including the image, in the decoder. Bitcoin. Testnet.
- Your Stamp will appear on Stampchain and Stamped Ninja.
- The token name is random. Click
Generate Transactionseveral times until you get one you’re happy with. - If the transaction gets stuck in mempool, you can increase the fee with RBF.
Categories: Uncategorized